Well, I have learned that stitchers are a wonderful and loving group that probably has no problem answering this question. Many have stitched for charities and other groups, spending hours of their time to create tokens that remind those in need that they are not alone or forgotten. Their work has translated into money that will be used to save a life or inspire hope. Some have mentored children and taught them the joy of stitching thereby building confidence. Others have shared their stashes with people that haven't the funds to pay rent, much less build a hobby. Others have crossed cultural divides to share a common passion, thereby building bridges.
All in all, stitchers are a generous lot, inclined to sharing and thoughtfulness. And, to quote John Lennon again, "imagine all the people living life in" stitches!!! It would be a grand world, I think. At the very least, it would keep the maladjusted busy!
Wishing all a New Year filled not just with stitching, and stash enhancements but also with continued gererosity and giving...creating a better world, stitch by stitch.
Christina
Friday, December 30, 2011
Tuesday, December 20, 2011
Floss Give-away
Nancy at the Victorian Motto Sampler Shoppe is having a floss giveaway. Check it out! Victorian Motto Sampler Shoppe. What lovely colors...Thanks Nancy for sharing.
Monday, December 19, 2011
Recently finished ornaments
Greetings fellow stitchers! Hope your fingers are busily stitching away and that you are having fun, too. Below are pics of two of my three finishes. I will post pic of the third tomorrow as I am displaying that one on my desk at work.
 Some of you that are members of the Yahoo Group "The Friendly Stitchers", might have heard me wailing about the difficult time I had finishing this into an ornament. Well, here it is. I can criticize where it all went wrong but I won't. The one achievement that I can sincerely talk about is that the pattern called for evenweave fabric and I decided to put this on Aida....the words are supposed to be done over one so that I actually pierced the Aida fibers to make it happen. It actually looks really good, surprisingly so. In case you can't tell, the shape is lop-sided, among other things. This patter is from The Gift of Stitching, November 2011 issue.
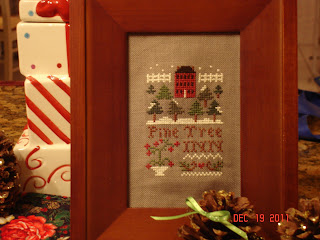 This is the first Little House Needleworks design that I have stitched. Its just adorable. Those of you familiar with the chart will recognize an error...hmmm...where is the error? Its not the thread substitions that I made, as follows: DMC 221 substituted with DMC 3678, DMC 433 substituted with DMC 801, Crescent Colours substituted with DMC 935, 937 and 3051. You can't see it in the picture but I used one thread of shimmery white DMC to lay over the mounds of snow and the snow on the trees so that they glisten.
However did I get my hands on pine cones in Miami?? Funny you should ask, we collected them in the Smoky Mountains on our last trip there in August. The kids decorated them with sparkels and little bows. Its just not Christmas without pine cones!!
 Here is a pic of my tree. It's covered in stitched ornaments and other trinkets. Its not very big but after it's decorated, I think it looks very GRAND!
Mouse, this is one is for you!


However did I get my hands on pine cones in Miami?? Funny you should ask, we collected them in the Smoky Mountains on our last trip there in August. The kids decorated them with sparkels and little bows. Its just not Christmas without pine cones!!

Mouse, this is one is for you!
Wednesday, December 14, 2011
Scrooge in Advertising
I was sitting in my living room, stitching away pleasantly when I looked up during a Best Buy commercial. As I watched, I saw a woman mocking Santa and pretty much just being a bad sport. Apparently, she was feeling very superior because she had "out-done" Santa and had saved a few dollars, too. Not only was she rude but also violent. She felt compelled to actually kick the plastic Santa off of the roof. Have any of you seen this commercial? It's so...so obnoxious. My 9 year-old says to me, "I know Santa is not real, but why is she being so mean?" I told her it was a horrible commercial and there was no explaining it.
Then there's the luxury car commercial ( I have no idea which one, maybe Audi - not Lexus tho). In this commercial, an older son comes home for the holidays carrying bags filled with presents and a cheery happy smile on his face, and just as he is coming in the front door, his older parents sneak out of the house and go for a joy-ride in his car, leaving him in the foyer, calling out to them. Really? I don't know about you, but where I am from, one does not leave one's guests in the foyer without saying SOMETHING.
What's with all the nastiness? Of the two, the anti-Santa one is the most disturbing but the second makes absolutely no sense to me.
There a few commercials that I do enjoy, and those are the happy, warm ones that make me feel all tingly inside. The Publix commercials are at the top of my list, of course, and there is the Jared commercial where the little kid dressed as Santa makes a delivery to his mom...too cute!
Have you any commercials that you hate or love at this season? Do share!
Thursday, December 1, 2011
Christmas Tree Decorating Instructions
I thought to share a few tree decorating ideas that seem to be very effective in getting that "wow" factor. These instructions have been tested in my own home using a real tree. Please do try this at home!
Your ornaments should be mended, whole and in general, in good shape. Lights should be in working order and your tree trimmed (if its natural) or properly splayed out if artificial.
1. Find your Christmas music and put it on. If you haven't any, make one the kids put a hamster on the piano key boards and let it run up and down the boards. The kid needs to provide constant supervision or the hamster may fall to its death and that would make for a crummy tree decorating memory, but maybe a good laugh or two in a few years... maybe not, hard to tell with kids these days.
2. Pour 3:1 parts of eggnog and scotch whiskey into a shaker. Shake until well blended, pour into a glass and take a sip.
3. If using a natural tree, make sure to water it at this time if you haven't done so already.
4. Decorate tree - start with the lights. Test them first! The lights should be the same, that is, the same size, the same style, the same color. If using white, then use all white, if using red, then all red, if using multicolor, then all are multicolor. Start on top and run the first string of lights closer to the trunk. Use as many strings as necessary to wrap around the inside part of the tree. Then take additional lights, beginning at the top, and lay them on the branches, more towards the outside. This will give the tree a layered look of lights and will make your tree glow inside and out! Take a sip of the eggnog.
5. Next, add the garlands. I use beads. You can use smaller diameter beads on the top third, then medium diameter in the 2nd third and larger diameter beads on the lower third. The key is to use the smaller garland towards the top and finish the bottom of the tree with the large ones. I like the effect of the garland hanging in a curve between the branches but you can lay them straighter across the branches. The key is consistency. Lay them in the same way all around the tree. Step back from the tree and make any adjustments necessary and take another sip of the eggnog.
5. Next, start adding the ornaments. Separate the ornaments by size. I pack them away by size so its easier, but if you are not that obsessive, then rummage thru your ornaments and pick out the smaller ones and put those towards the top of the tree. The medium sized ones go in the middle of the tree, and the large ones...you guessed it, they go towards the lower part of the tree. The key is start on top with small and then work your way down the tree finishing with the larger ornaments.
As you are doing all this, take a few steps away from the tree every few ornaments and check on placement; filling any gaps as necessary. If you are getting so called help with decorating the tree, you will want to step back more often and move things around, but do this discreetly so folks don't get all bent and start yelling at you and stomping off. I also advise that you do not allow any drunken guests or family members to help with this crucial evaluation step as I find that their wobbling makes them incapable of determining if anything is off kilter.
6. OK, take one last look and reposition any ornaments or garland until its perfect. Your not done, yet!
7. My sister introduced me to adding little red bows to the tips of the branches. I find that this part is the piece de resistance. Of course, your bows should be a color that complements the general colour theme of your tree. You have two options here, place the bows randomly or place them in rows so that they appear to wrap around the tree like a ribbon or garland. The first method is easier, the second is a nightmare and borders on the psychotic (no offense to those of you out there that are doing it this way as its quite impressive and I am sure that your are not actually psychotic - not that there is anything wrong, necessarily with being psychotic - I think I will stop now). If you decide to try the latter method, you might want to have several sips of the eggnog as you do this and not wait til the end for your treat. Of course, this means that you might have do it all over again if you drink too much!
If placing randomly, the key is to make sure that an ornament hangs from just under the bow. So that as you go around the tree (again, starting from the top) you want to reposition the ornaments to fit on the same branch as the bow so that bow appears to sit on top of the ornament. Very cute! Take another sip of the eggnog. You might need to fix yourself some more eggnog depending on how big your sips have been. You could switch to drinking Ponche Cuba, instead.

8. Place the tree topper on the tree, using whatever methods necessary to make sure the darn thing is on straight and securely.
9. Sweep up the space under and around the tree.
10. Place the tree skirt around the tree. You can now decorate under the tree.
Well, that's it and I hope you find these to be helpful. If you have any suggestions for making these instructions better, please do share!
Your ornaments should be mended, whole and in general, in good shape. Lights should be in working order and your tree trimmed (if its natural) or properly splayed out if artificial.
1. Find your Christmas music and put it on. If you haven't any, make one the kids put a hamster on the piano key boards and let it run up and down the boards. The kid needs to provide constant supervision or the hamster may fall to its death and that would make for a crummy tree decorating memory, but maybe a good laugh or two in a few years... maybe not, hard to tell with kids these days.
2. Pour 3:1 parts of eggnog and scotch whiskey into a shaker. Shake until well blended, pour into a glass and take a sip.
3. If using a natural tree, make sure to water it at this time if you haven't done so already.
4. Decorate tree - start with the lights. Test them first! The lights should be the same, that is, the same size, the same style, the same color. If using white, then use all white, if using red, then all red, if using multicolor, then all are multicolor. Start on top and run the first string of lights closer to the trunk. Use as many strings as necessary to wrap around the inside part of the tree. Then take additional lights, beginning at the top, and lay them on the branches, more towards the outside. This will give the tree a layered look of lights and will make your tree glow inside and out! Take a sip of the eggnog.
5. Next, add the garlands. I use beads. You can use smaller diameter beads on the top third, then medium diameter in the 2nd third and larger diameter beads on the lower third. The key is to use the smaller garland towards the top and finish the bottom of the tree with the large ones. I like the effect of the garland hanging in a curve between the branches but you can lay them straighter across the branches. The key is consistency. Lay them in the same way all around the tree. Step back from the tree and make any adjustments necessary and take another sip of the eggnog.
5. Next, start adding the ornaments. Separate the ornaments by size. I pack them away by size so its easier, but if you are not that obsessive, then rummage thru your ornaments and pick out the smaller ones and put those towards the top of the tree. The medium sized ones go in the middle of the tree, and the large ones...you guessed it, they go towards the lower part of the tree. The key is start on top with small and then work your way down the tree finishing with the larger ornaments.
As you are doing all this, take a few steps away from the tree every few ornaments and check on placement; filling any gaps as necessary. If you are getting so called help with decorating the tree, you will want to step back more often and move things around, but do this discreetly so folks don't get all bent and start yelling at you and stomping off. I also advise that you do not allow any drunken guests or family members to help with this crucial evaluation step as I find that their wobbling makes them incapable of determining if anything is off kilter.
6. OK, take one last look and reposition any ornaments or garland until its perfect. Your not done, yet!
7. My sister introduced me to adding little red bows to the tips of the branches. I find that this part is the piece de resistance. Of course, your bows should be a color that complements the general colour theme of your tree. You have two options here, place the bows randomly or place them in rows so that they appear to wrap around the tree like a ribbon or garland. The first method is easier, the second is a nightmare and borders on the psychotic (no offense to those of you out there that are doing it this way as its quite impressive and I am sure that your are not actually psychotic - not that there is anything wrong, necessarily with being psychotic - I think I will stop now). If you decide to try the latter method, you might want to have several sips of the eggnog as you do this and not wait til the end for your treat. Of course, this means that you might have do it all over again if you drink too much!
If placing randomly, the key is to make sure that an ornament hangs from just under the bow. So that as you go around the tree (again, starting from the top) you want to reposition the ornaments to fit on the same branch as the bow so that bow appears to sit on top of the ornament. Very cute! Take another sip of the eggnog. You might need to fix yourself some more eggnog depending on how big your sips have been. You could switch to drinking Ponche Cuba, instead.
8. Place the tree topper on the tree, using whatever methods necessary to make sure the darn thing is on straight and securely.
9. Sweep up the space under and around the tree.
10. Place the tree skirt around the tree. You can now decorate under the tree.
Well, that's it and I hope you find these to be helpful. If you have any suggestions for making these instructions better, please do share!
General Update
Greetings to all,
Had a bit of a stressful week. Hubby has been ill and spent some time in the hospital but he is better. Now, he just has to believe that he is better ...hee, hee.
My TGOS ornament would have been finished last night except that I didn't have the beads... boy, was I in a funk! I have to finish the Sleigh Ride ornament and another I started last night, LHN Pine Tree House, I think its called. Pics later!
As soon as I am done with those, I am going to start on this needle fob by Shepard's Bush. Its not my typical style but I thought it was too sweet (hence the name, sweet stitches fob!).

I am not too sure how to make the ribbon ruched like that. Are there any good tutorials out there?
Thank you for visiting and hope your week is going well! Blessed Be!
Sunday, November 27, 2011
Ornaments, Past and Present
Hello friends,
I thought to post a few pics of ornaments. My sister, who is a very talented stitcher, made the teacups. You might be able to see the tiny pewter charms in the shape of tea bags that she attached just under the bows on the tea cup ornaments. Just precious!
 This is the lovely ornament that I received from my exchange partner, Dianne, in Canada. It's done in a lovely variegated teal floss and its very unique...I love it. Thank you, Dianne.


 This one is done over one, so this it is very small and cute. =)

 You can see the little tea bag in this one.
 This is the one from TGOS that I am doing over Aida. The words are supposed to be done over one. Its been quite a challenge but its turning out OK.
 Isn't he cute? This one is from the Cross Stitch and Needlework magazine, a few years ago. It's done on a pale blue fabric.

 My sister made this one, too.
 A freebie from somewhere? Using DMC variegated in a deep red/burgundy.
 This one is from the 80's.

Well, that's my little trip thru the years in ornaments. Ornaments are a great way of seeing the evolution of style over the years. I like to think that my daughters will pass these on to their daughters. How many years does your ornament collection span?
I thought to post a few pics of ornaments. My sister, who is a very talented stitcher, made the teacups. You might be able to see the tiny pewter charms in the shape of tea bags that she attached just under the bows on the tea cup ornaments. Just precious!


I received this one and the following two from my exchange partner Kate. She couldn't decide which one to send so she sent three. They are just too cute. The purple one above has sparkly thread in the star and around the lettering. Thank you so much for these, Kate!


These two little stocking will feel right at home amongst my other stockings!


From the 90's.
Well, that's my little trip thru the years in ornaments. Ornaments are a great way of seeing the evolution of style over the years. I like to think that my daughters will pass these on to their daughters. How many years does your ornament collection span?
Subscribe to:
Posts (Atom)